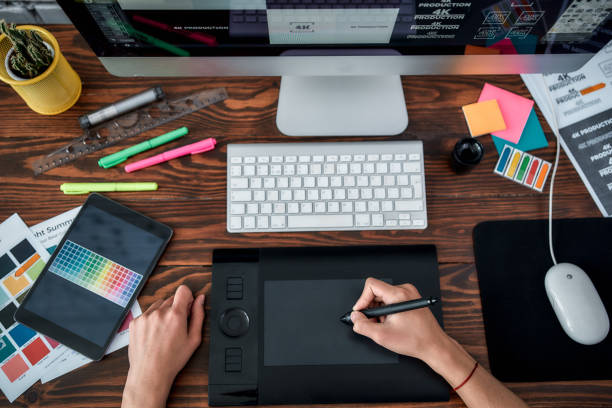
Amazing Graphic Design Tools for Designer

To execute their everyday tasks, graphic and web designers use a number of graphic design tools. A designer will have a strong foundation for communicating ideas and simplifying work if he or she just uses a few tools. To go from a competent to a great designer, all you need to do is carry a set of tools with you.
Here’s a review of some of the best tools and programmes for getting started with your online projects.
- QuickReviewer
QuickReviewer is an online proofing tool for designers, web developers, and marketers who want to work on design projects more quickly and get feedback and approval more quickly. It’s an excellent collaboration tool since it makes online proofing simple and convenient. Images, movies, live web connections, HTML, PDFs, and audios may all be examined with it. Users may analyze and approve files on their mobile devices thanks to QuickReviewer’s mobile-responsive UI. QuickReviewer makes it easy to organize comments on creative work by eliminating the need for several emails or files. Users may contribute comments to documents by highlighting text, pointing out changes, or drawing modifications, and comparing versions side by side. Adding real-world links or dragging and dropping HTML zip files to test designs on various screen sizes, animated HTML banners, responsive web pages, and more features will make creative collaboration a snap.
- Adobe Photoshop
Photoshop is a powerful design and pattern-making programme that will help you become the best designer you can be. It gives graphic designers a wide range of choices, tools, and settings to allow them to experiment with new ideas and produce more realistic designs with the right guidance. It assists you in absorbing new knowledge and creating digital artwork based on your ideas, learning by following step-by-step instructions, speeding up your creative process, and staying motivated with frequent emails and lessons.
- Adobe Illustrator
To speed up your creative process, Adobe Illustrator allows you to alter 2D or 3D images. Illustrator may be used by both professional graphic designers and digital artists to generate a wide range of digital material.
- Filestage
Filestage is a graphic designer-focused online review and approval tool that gives them complete control over the content review process. Using the tool, graphic designers may collaborate with internal and external stakeholders on a range of file formats, including pictures, PDFs, websites, and more. It also provides a quick overview of the project’s progress.
- PicsArt
PicsArt’s all-in-one online Photo Editor includes a variety of editing tools that let you produce professional-looking material even if you don’t have any design knowledge. They even offer a robust Video Editor where you can edit your videos and add music and effects. PicsArt’s tools are easy to use, straightforward, and cost nothing.
- Desygner
Designer’s editor is an incredibly user-friendly drag-and-drop Illustrator substitute. Replace photographs with a single click, and drag and drop components into the design to change fonts, colors, and text. Layers and several pages are simple to work with. On Desygner, you may search for royalty-free photographs using any keyword and obtain the highest quality royalty-free images for your projects.
- Fotor
Simply upload your own photo or use one of Fotor’s stock photos, then add text and stickers to make it uniquely yours. Templates and stickers, as well as texts and fonts, loud saving, and other services, are all available through Fotor.
- Logaster
With Logaster, you may create a huge number of designs in a short amount of time. Your logo may also be used to make business cards and visuals for social media. Logos may be customised and downloaded, or they can just be used for inspiration.
- Sketch 3
Sketch 3 has all of the nested symbol sets you’ll need to create your best work. You can quickly mix the symbols to create a reusable and personalized design. Designers will like artboards, text and shared styles, the color picker, pixel accuracy, and many other capabilities.
- Marvel
Marvel is a prototyping tool. Prototyping is now an important part of the web design process. You can build anything from the ground up with Marvel, and you can even sync your creations from your online storage! Include transitions and movements in your design prototype. Marvel’s user interface is straightforward, making it simple to pick up. Both non-designers and seasoned UX specialists can utilise the tool.
- Pixelmator
Pixelmator is a single-window application with simple editing tools and smart image manipulation features. Because it provides basic features for moving, resizing, and arranging layers, it’s the finest tool for creating a range of projects.
- Sublime
Sublime is a simple coding editor that lets you focus solely on your code. This will provide you a lot of power if you work on websites since it gives you strong shortcuts and tools for navigating around a document, filtering it, and making quick changes.
- Github
It’s a platform that lets you collaborate on the same server with other project participants while also hosting your code on a remote Git server with a wonderful web interface.
- Webflow
Webflow makes it possible to create websites in a short period of time. With webflow, you can easily design and develop at the same time. To use this tool, you don’t need to know how to code; simply export and alter the site’s html / css tags to meet your needs.
- Iconfinder
It features the world’s largest premium icon library. All 2,171,326 icons are accessible in SVG, PNG, and IconJar formats.
- Coolors
It’s a lightning-quick color scheme generator that creates, saves, and distributes the perfect palette in seconds, resulting in a Material Design palette that you can download. They may be saved to your account or exported in a variety of formats, including. PNG,. PDF,. SVG, and others. A Chrome Extension, an iOS App, and an Adobe Add-on are also available for Coolors.
Conclusion
It’s important to remember that becoming a competent designer needs not just creative ideas and execution, but also the use of the right tools. As a designer, you’ll have a solid foundation for presenting your ideas and optimizing your work if you just use a few tools. So, all you need to move from a decent to a great designer is a set of online and graphic design tools, and you’ll be able to breeze through the process with little extra effort.
When it comes to designing products and services for clients, a graphic designer is crucial. The message will be simply and clearly understood by the intended market as a result of this design. This knowledge will result in a purchase, resulting in a profit for the customer. Similarly, with any other work, it is necessary to provide a proper flow of activities and establish a method.
Regardless of the type of designer you are, you should follow this graphic design process with the purpose of achieving the highest possible quality outputs for all projects you encounter.
You’ll be able to deliver better designs if you have a sound graphic design process. You won’t have to worry about the following steps every time you start a new project after you’ve developed a system. Simply stick to your strategy. Then you’ll be able to concentrate on what matters most: graphic design.
Despite the fact that the graphic design process is very common, there are methods to make it better. We came up with a list of 9 actions to improve the design process, one for each phase of the process. Let’s have a look at the various steps of the graphic design process first.
Graphic Design Process:
The graphic design process is divided into 4 phases which in total consists of 9 steps.
The 4 phases are Definition Phase, Creation Phase, Feedback Phase, Delivery Phase. Now let’s take a detailed look into these 4 phases.
Definition Phase:
This phase consists of the first three steps of the graphic design process.
Step 1: Creative Brief
The creative brief is the initial stage in the creative graphic design process. It assists the designer in learning more about the client’s requirements. This stage is crucial because the designer needs to learn all he or she can about the customer, his or her firm, and the project’s goals.
The creative brief is the project’s basis, and it will have a considerable impact on the phases that follow.
If it’s done over the phone or over email, the graphic designer will have to organize the information after obtaining it, and data may be lost.
You may utilize tools to develop basic forms that you can then distribute with your customer.
You may fill them out with as much information as you like, and the tool will keep it for you. You may quickly log in and check the submission if you need to evaluate the first replies.
Step 2: Graphic Design Research
After a designer receives the brief and understands what the customer requires, they should conduct market research. This part of the process is obtaining as much data as possible to aid in the development of your design. This refers to the path your design will go as well as all of your future project decisions.
This information might be about the customer, what they do, previous designs, and so forth. It’s possible that the client’s competitors’ branding and designs are to blame. Alternatively, the target audience and what they respond to and don’t respond to. Possibly what is now doing well in the industry as a whole. Market research is critical for determining how your design should or should not appear.
Step 3: Brainstorming / Mood Boarding
The next step is brainstorming, which I’m sure you’re well familiar with. Brainstorming is the initial stage in determining how you will approach the client’s brief in terms of design. This entails determining what you will really develop for the customer. Brainstorming is putting pen to paper and coming up with ideas on how to creatively tackle the problem that the customer has presented to you.
This is something that can be done as a group. This has advantages since the more people there are, the more ideas you can generate. If you work alone or freelance, you may complete your brainstorming on your own, ensuring that all of the ideas are yours and yours alone! Not every suggestion you make will be fantastic, but that’s the objective of brainstorming.
The aesthetic direction of a project is inspired by mood boarding. From color to typography, they may be used to identify just about everything. They’re an excellent technique to make critical project decisions before getting started on the real design. Always remember to set them out and identify them accurately. This allows them to be rapidly and readily referred to in the future.
Creation Phase:
This phase consists of the next three steps of the graphic design process.
Step 4: Sketching
It’s now time to start drawing based on your prioritized ideas. You can do it online, but starting offline will help you concentrate and prevent other distractions. This is your chance to try out different things and see what works best for you in terms of turning your ideas into a finished product.
Step 5: Design Building
After you’ve shown your customer your best designs, he or she will give you some first input. You may now begin work on the final designs. It will be crucial at this point to come up with many design options.
You’ll be able to provide them the option of choosing between current designs this way. You’ll probably need a number of various visual materials to develop these designs; you shouldn’t make everything from scratch.
Step 6: Refining
You’ll need to start improving your designs based on your client’s input. However, before presenting the drawings to your customer again, you might solicit immediate input from others. Don’t only rely on your family and friends for comments; show your work to designers as well. You should become active on several platforms and share your work with professionals, also, interact with other members of the community.
Feedback Phase:
Feedback consists of steps 7 and 8.
Step 7: Presenting
The manner you present your work will influence the amount of revisions you receive as well as the comments you receive. Of course, it is also contingent on your customers. The ability to tell a story regarding your designs can aid you in persuading your client.
Take the time to display your work appropriately. Take calls for design milestones and significant modifications should be scheduled. Use these sessions to share your design’s story. Concentrate on showing your design process. As a result, your client will have a greater understanding of your job.
Even if your customer disagrees, your presentation will clarify your point of view, which may persuade him or her to accept your proposal.
Step 8: Revisions
Most of the time, you’ll get a lot of requests for revisions and a lot of unstructured comments. As a result, you’ll need to collect input, organize it, and make the necessary modifications to build an approval procedure. Online proofing solutions like QuickReviewer can help you arrange input and speed up your review cycles in these situations.
Delivery Phase:
This phase consists of the final step of the graphic design process.
Step 9: Final Delivery
When the process of developing and reviewing is completed. Everything should be packaged and sent to the client.
Conclusion:
Here are nine fairly straightforward phases that make up the graphic design process. These are the fundamental phases in every design project you will work on in your professional career, and they should be followed if you want to produce a successful personal, passion project as well.
When it comes to designing products and services for clients, a graphic designer is crucial. The message will be simply and clearly understood by the intended market as a result of this design. This knowledge will result in a purchase, resulting in a profit for the customer. Similarly, with any other work, it is necessary to provide a proper flow of activities and establish a method.
Regardless of the type of designer you are, you should follow this graphic design process with the purpose of achieving the highest possible quality outputs for all projects you encounter.
You’ll be able to deliver better designs if you have a sound graphic design process. You won’t have to worry about the following steps every time you start a new project after you’ve developed a system. Simply stick to your strategy. Then you’ll be able to concentrate on what matters most: graphic design.
Despite the fact that the graphic design process is very common, there are methods to make it better. We came up with a list of 9 actions to improve the design process, one for each phase of the process. Let’s have a look at the various steps of the graphic design process first.
Graphic Design Process:
The graphic design process is divided into 4 phases which in total consists of 9 steps.
The 4 phases are Definition Phase, Creation Phase, Feedback Phase, Delivery Phase. Now let’s take a detailed look into these 4 phases.
Definition Phase:
This phase consists of the first three steps of the graphic design process.
Step 1: Creative Brief
The creative brief is the initial stage in the creative graphic design process. It assists the designer in learning more about the client’s requirements. This stage is crucial because the designer needs to learn all he or she can about the customer, his or her firm, and the project’s goals.
The creative brief is the project’s basis, and it will have a considerable impact on the phases that follow.
If it’s done over the phone or over email, the graphic designer will have to organize the information after obtaining it, and data may be lost.
You may utilize tools to develop basic forms that you can then distribute with your customer.
You may fill them out with as much information as you like, and the tool will keep it for you. You may quickly log in and check the submission if you need to evaluate the first replies.
Step 2: Graphic Design Research
After a designer receives the brief and understands what the customer requires, they should conduct market research. This part of the process is obtaining as much data as possible to aid in the development of your design. This refers to the path your design will go as well as all of your future project decisions.
This information might be about the customer, what they do, previous designs, and so forth. It’s possible that the client’s competitors’ branding and designs are to blame. Alternatively, the target audience and what they respond to and don’t respond to. Possibly what is now doing well in the industry as a whole. Market research is critical for determining how your design should or should not appear.
Step 3: Brainstorming / Mood Boarding
The next step is brainstorming, which I’m sure you’re well familiar with. Brainstorming is the initial stage in determining how you will approach the client’s brief in terms of design. This entails determining what you will really develop for the customer. Brainstorming is putting pen to paper and coming up with ideas on how to creatively tackle the problem that the customer has presented to you.
This is something that can be done as a group. This has advantages since the more people there are, the more ideas you can generate. If you work alone or freelance, you may complete your brainstorming on your own, ensuring that all of the ideas are yours and yours alone! Not every suggestion you make will be fantastic, but that’s the objective of brainstorming.
The aesthetic direction of a project is inspired by mood boarding. From color to typography, they may be used to identify just about everything. They’re an excellent technique to make critical project decisions before getting started on the real design. Always remember to set them out and identify them accurately. This allows them to be rapidly and readily referred to in the future.
Creation Phase:
This phase consists of the next three steps of the graphic design process.
Step 4: Sketching
It’s now time to start drawing based on your prioritized ideas. You can do it online, but starting offline will help you concentrate and prevent other distractions. This is your chance to try out different things and see what works best for you in terms of turning your ideas into a finished product.
Step 5: Design Building
After you’ve shown your customer your best designs, he or she will give you some first input. You may now begin work on the final designs. It will be crucial at this point to come up with many design options.
You’ll be able to provide them the option of choosing between current designs this way. You’ll probably need a number of various visual materials to develop these designs; you shouldn’t make everything from scratch.
Step 6: Refining
You’ll need to start improving your designs based on your client’s input. However, before presenting the drawings to your customer again, you might solicit immediate input from others. Don’t only rely on your family and friends for comments; show your work to designers as well. You should become active on several platforms and share your work with professionals, also, interact with other members of the community.
Feedback Phase:
Feedback consists of steps 7 and 8.
Step 7: Presenting
The manner you present your work will influence the amount of revisions you receive as well as the comments you receive. Of course, it is also contingent on your customers. The ability to tell a story regarding your designs can aid you in persuading your client.
Take the time to display your work appropriately. Take calls for design milestones and significant modifications should be scheduled. Use these sessions to share your design’s story. Concentrate on showing your design process. As a result, your client will have a greater understanding of your job.
Even if your customer disagrees, your presentation will clarify your point of view, which may persuade him or her to accept your proposal.
Step 8: Revisions
Most of the time, you’ll get a lot of requests for revisions and a lot of unstructured comments. As a result, you’ll need to collect input, organize it, and make the necessary modifications to build an approval procedure. Online proofing solutions like QuickReviewer can help you arrange input and speed up your review cycles in these situations.
Delivery Phase:
This phase consists of the final step of the graphic design process.
Step 9: Final Delivery
When the process of developing and reviewing is completed. Everything should be packaged and sent to the client.
[/et_pb_text][/et_pb_column][/et_pb_row][et_pb_row _builder_version=”3.3.1″ custom_padding=”0|0px|27px|0px|false|false”][et_pb_column type=”4_4″][et_pb_text _builder_version=”3.3.1″]
Conclusion:
Here are nine fairly straightforward phases that make up the graphic design process. These are the fundamental phases in every design project you will work on in your professional career, and they should be followed if you want to produce a successful personal, passion project as well.
When it comes to designing products and services for clients, a graphic designer is crucial. The message will be simply and clearly understood by the intended market as a result of this design. This knowledge will result in a purchase, resulting in a profit for the customer. Similarly, with any other work, it is necessary to provide a proper flow of activities and establish a method.
Regardless of the type of designer you are, you should follow this graphic design process with the purpose of achieving the highest possible quality outputs for all projects you encounter.
You’ll be able to deliver better designs if you have a sound graphic design process. You won’t have to worry about the following steps every time you start a new project after you’ve developed a system. Simply stick to your strategy. Then you’ll be able to concentrate on what matters most: graphic design.
Despite the fact that the graphic design process is very common, there are methods to make it better. We came up with a list of 9 actions to improve the design process, one for each phase of the process. Let’s have a look at the various steps of the graphic design process first.
Graphic Design Process:
The graphic design process is divided into 4 phases which in total consists of 9 steps.
The 4 phases are Definition Phase, Creation Phase, Feedback Phase, Delivery Phase. Now let’s take a detailed look into these 4 phases.
Definition Phase:
This phase consists of the first three steps of the graphic design process.
Step 1: Creative Brief
The creative brief is the initial stage in the creative graphic design process. It assists the designer in learning more about the client’s requirements. This stage is crucial because the designer needs to learn all he or she can about the customer, his or her firm, and the project’s goals.
The creative brief is the project’s basis, and it will have a considerable impact on the phases that follow.
If it’s done over the phone or over email, the graphic designer will have to organize the information after obtaining it, and data may be lost.
You may utilize tools to develop basic forms that you can then distribute with your customer.
You may fill them out with as much information as you like, and the tool will keep it for you. You may quickly log in and check the submission if you need to evaluate the first replies.
Step 2: Graphic Design Research
After a designer receives the brief and understands what the customer requires, they should conduct market research. This part of the process is obtaining as much data as possible to aid in the development of your design. This refers to the path your design will go as well as all of your future project decisions.
This information might be about the customer, what they do, previous designs, and so forth. It’s possible that the client’s competitors’ branding and designs are to blame. Alternatively, the target audience and what they respond to and don’t respond to. Possibly what is now doing well in the industry as a whole. Market research is critical for determining how your design should or should not appear.
Step 3: Brainstorming / Mood Boarding
The next step is brainstorming, which I’m sure you’re well familiar with. Brainstorming is the initial stage in determining how you will approach the client’s brief in terms of design. This entails determining what you will really develop for the customer. Brainstorming is putting pen to paper and coming up with ideas on how to creatively tackle the problem that the customer has presented to you.
This is something that can be done as a group. This has advantages since the more people there are, the more ideas you can generate. If you work alone or freelance, you may complete your brainstorming on your own, ensuring that all of the ideas are yours and yours alone! Not every suggestion you make will be fantastic, but that’s the objective of brainstorming.
The aesthetic direction of a project is inspired by mood boarding. From color to typography, they may be used to identify just about everything. They’re an excellent technique to make critical project decisions before getting started on the real design. Always remember to set them out and identify them accurately. This allows them to be rapidly and readily referred to in the future.
Creation Phase:
This phase consists of the next three steps of the graphic design process.
Step 4: Sketching
It’s now time to start drawing based on your prioritized ideas. You can do it online, but starting offline will help you concentrate and prevent other distractions. This is your chance to try out different things and see what works best for you in terms of turning your ideas into a finished product.
Step 5: Design Building
After you’ve shown your customer your best designs, he or she will give you some first input. You may now begin work on the final designs. It will be crucial at this point to come up with many design options.
You’ll be able to provide them the option of choosing between current designs this way. You’ll probably need a number of various visual materials to develop these designs; you shouldn’t make everything from scratch.
Step 6: Refining
You’ll need to start improving your designs based on your client’s input. However, before presenting the drawings to your customer again, you might solicit immediate input from others. Don’t only rely on your family and friends for comments; show your work to designers as well. You should become active on several platforms and share your work with professionals, also, interact with other members of the community.
Feedback Phase:
Feedback consists of steps 7 and 8.
Step 7: Presenting
The manner you present your work will influence the amount of revisions you receive as well as the comments you receive. Of course, it is also contingent on your customers. The ability to tell a story regarding your designs can aid you in persuading your client.
Take the time to display your work appropriately. Take calls for design milestones and significant modifications should be scheduled. Use these sessions to share your design’s story. Concentrate on showing your design process. As a result, your client will have a greater understanding of your job.
Even if your customer disagrees, your presentation will clarify your point of view, which may persuade him or her to accept your proposal.
Step 8: Revisions
Most of the time, you’ll get a lot of requests for revisions and a lot of unstructured comments. As a result, you’ll need to collect input, organize it, and make the necessary modifications to build an approval procedure. Online proofing solutions like QuickReviewer can help you arrange input and speed up your review cycles in these situations.
Delivery Phase:
This phase consists of the final step of the graphic design process.
Step 9: Final Delivery
When the process of developing and reviewing is completed. Everything should be packaged and sent to the client.
Conclusion:
Here are nine fairly straightforward phases that make up the graphic design process. These are the fundamental phases in every design project you will work on in your professional career, and they should be followed if you want to produce a successful personal, passion project as well.